One small sampler.
A real next step.
Use the same grid you just read.
Begin on paper, then try a spare piece of cloth.
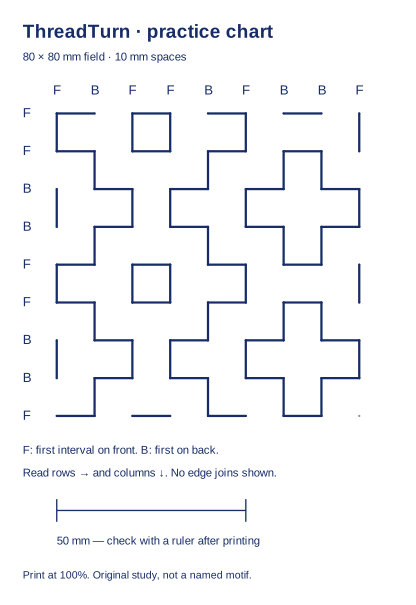
This is the original front pattern from chapter 3. It is a reading exercise, not a garment repair specification or a named traditional motif.
Take the measured chart SVG · 110 × 160 mm sheetOpen the downloaded SVG in a browser or vector editor. Print at 100% / Actual size; turn off Fit or Shrink. Measure the 50 mm bar. If it prints at 45 mm, the 80 mm field has shrunk to 72 mm. Correct the print settings before transferring.
Or skip printing: draw nine horizontal and nine vertical lines, 10 mm apart. Nine lines make eight spaces. The file dimensions are checked digitally; your printer still needs the ruler check.
Give the grid room.
For this practice, an approximately 120 × 120 mm spare square leaves 20 mm around the 80 mm field. This margin is our exercise allowance, not a universal sashiko measurement. Keep the grid away from an existing seam, hem or damaged edge.
Choose cloth and thread intended to be stitched together, a suitable needle, a ruler and a removable textile marking method. A scrap lets you try the needle and marker before committing a favourite garment. Test both visibility and removal on the same fabric; follow the marker and fabric instructions.
For this original grid, mark one horizontal reference and a perpendicular vertical reference. Add the other lines at 10 mm intervals, then check that the first-to-last distance is 80 mm in both directions. Checking the whole field catches a spacing error that repeats across every cell.
For a demonstration of transferring a pattern and handling thread, use Upcycle Stitches’ practitioner tutorials. Their materials and techniques are not reproduced here.
Read one run at a time.
- Try row 1 on paper. Its first interval is on the front. Mark spaces 1, 3, 5 and 7. The spaces between those marks belong to the back.
- Compare row 3. It begins on the back, so the visible spaces become 2, 4, 6 and 8. Read left to right even if you later work a physical row in the other direction.
- Finish the horizontal set. Follow the F/B labels for all nine rows. F means the first interval is visible on the front; B means it is hidden there.
- Add the vertical set. Read the column labels from left to right and each run from top to bottom. Start column 2 on the back. Do not turn a horizontal thread around the corner of a drawn shape to create that column.
- Check the other face. Keep the top at the top as you turn the cloth around a vertical edge. The left corner moves right, as in chapter 3. Compare neighbouring intervals, not only the outline.
The diagram omits thread tails, edge travel and securing stitches. Those are physical decisions, not blank spaces to fill with a guessed long jump. Follow the starting, ending and turning method taught for your fabric and project.
Let the cloth stay cloth.
Lay the sample flat while you work. A diagram keeps perfect geometry regardless of tension; fabric does not. If a row gathers the fabric, stop and check the thread’s freedom to move before adding the next direction.
Atsushi Futatsuya explains how smoothing the thread and allowing room at turns relate to tension in his discussion of loops and Itokoki. The interactive model cannot teach the pressure of a hand or test the strength of a finished repair.
Should I knot the ends?
There is no single answer for every sashiko project. A knot and overlapping stitches make different choices about security, bulk and the reverse. Learn the method in your chosen project rather than treating an unfinished screen edge as an instruction. Futatsuya’s discussion of knots and no knots explains the choice; his tutorial directory demonstrates overlay stitching.
Why does my reverse not look like the screen?
First check orientation: a vertical-edge turn exchanges left and right. Then check a single row’s starting face. Finally separate interior pattern stitches from securing stitches and edge connections. Those extra physical threads are deliberately absent from this model. A different reverse does not, by itself, prove a mistake.
Can I use this to repair a hole?
This exercise explains a stitch chart. It does not choose patch fabric, cover a weak area or specify a structural repair. For a garment, choose instruction that addresses the fabric, wear location and patch construction. Practise on a spare sample before working on the garment.
Find the first mismatch.
A whole sampler can look wrong when only one decision changed. Before unpicking anything, mark the same top-left corner on the chart and the cloth. Compare the front first. A reverse photograph without an orientation mark is a poor starting point.
Every dash on one row has moved
On this chart, row 3 starts on the back. Its front intervals are 2, 4, 6 and 8. Suppose your row shows 1, 3, 5 and 7 instead. All four marks have changed together: that is the signature of a different starting face. The spacing may still be perfectly consistent. Check the row label before deciding that every individual stitch is the wrong length.
Use the crossing-lines lesson to change one start and see what moves. If the difference is intentional, record it as your variant. If you want the supplied chart, decide whether to redo that run before adding crossing threads. This is a chart-reading decision, not an instruction to pull a finished piece apart.
The first few cells fit, but the far edge misses
For the 80 mm practice field, the eight spaces must add to 80 mm. Eight spaces marked at 9.5 mm give 76 mm: a 4 mm difference at the far edge. A ruler laid over the first cell alone can miss this accumulated error. Check the first-to-last line distance horizontally and vertically, then inspect individual spaces.
If the printed 50 mm bar and both field dimensions have shrunk by the same fraction, suspect print scaling. If the bar is correct but your hand-drawn far edge is short, inspect the transferred grid. If the marked grid was correct before stitching but the fabric is now gathered, stop measuring it as if it were rigid paper; return to the tension discussion above. These observations narrow the question without pretending that a screen can diagnose your fabric.
The front matches, but the back surprises you
Trace one physical interval through the cloth. Is it the same interval after the left-right turn? Is it an interior stitch, an edge connection or a secured end? A diagonal thread at the edge may belong to travel between runs; it is not evidence that an interior dash has changed face. This model deliberately omits those connections.
Keep a short record before changing the sample: which row, which interval, which face, and what you expected. Include the grid spacing, thread and cloth. Photograph the whole piece and one close view with the orientation mark still visible. Compare the next attempt against that record, not against memory.
Download a blank two-face observation slip · Plain text, with this row-3 example and space for your own measurements. It is a practice record, not a repair prescription.
Use and share the chart.
The original chart and drawings may be printed, shared and adapted for your own practice or a group lesson, including commercial teaching. Credit ThreadTurn when redistributing and identify your changes. This permission covers our drawings, not the articles or media on linked websites. It implies no endorsement.
Sharing a class page or arranging a practice group?
Put the actual chart download and its print dimensions on the page. Include the scale-check instruction and a picture of each face. If you maintain that public page, WebTraceCheck can help you inspect its browser-visible behaviour and download journey.
If your own event form sends a confirmation, use invented details and a CleanTempMail temporary inbox for a non-sensitive test submission. Use a durable address for participants’ real registrations, purchases and account recovery. Neither product is needed to use this book.
Both products share this site’s operator. Links carry site and placement campaign labels, not lesson answers or personal input. Their own terms and privacy policies apply.